When it comes to bridal beauty and festive elegance, nothing speaks louder than a royal royal front hand mehndi design. This specific style combines opulence with intricate detailing, making it the go-to choice for modern brides who want their hands to narrate a story of heritage and grandeur. The phrase “royal royal” itself emphasizes a double dose of majesty—where every leaf, paisley, and lattice work echoes the richness of ancient courts. Choosing a royal royal front hand mehndi design ensures that your front hand becomes the centerpiece of your bridal look, as it is the most visible part during rituals, ring exchanges, and photography. Unlike back-hand patterns that often hide in sleeves, the front hand is always on display, making a royal royal front hand mehndi design a non-negotiable element for any woman seeking regal appeal. From traditional weddings to contemporary fusion ceremonies, this design adapts beautifully, offering versatility without losing its majestic flair. Moreover, the royal royal front hand mehndi design works well with both Arabic and Indo-western motifs, allowing you to customize the thickness of lines and density of fillings. In short, if you desire sophistication that turns heads and sparks conversation, invest in a royal royal front hand mehndi design today.
Key Elements That Define a Royal Royal Front Hand Mehndi Design
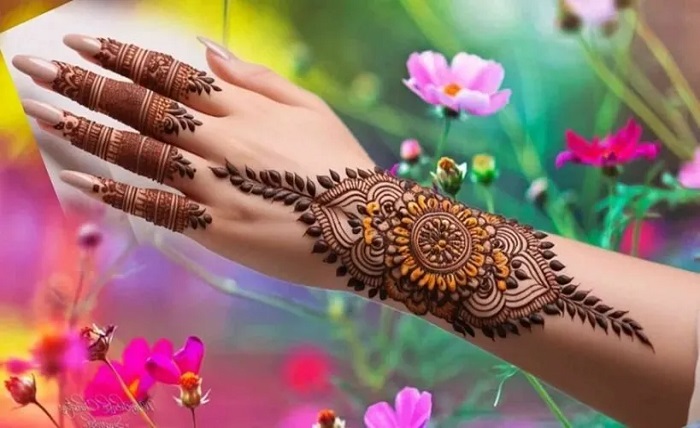
To truly master the aesthetic, you must understand the core components of a royal royal front hand mehndi design. First, symmetry plays a pivotal role. A royal royal front hand mehndi design often mirrors elements on the left and right sides of the palm and fingers, creating a balanced, crown-like appearance. Second, the use of heavy, interconnected paisleys—sometimes called “mango motifs”—is a signature feature. These paisleys are not isolated; instead, they flow into each other, forming a continuous tapestry that screams royalty. Third, the inclusion of lattice or jaali work (net-like patterns) adds depth. A royal royal front hand mehndi design frequently employs negative space in the center of the palm, surrounded by dense floral clusters, which gives a “window to the skin” effect—a hallmark of royal mehndi. Fourth, finger patterns are elongated, often extending from the tip to the first knuckle, adorned with tiny dots and dashes. Fifth, the wrist area in a royal royal front hand mehndi design typically features a thick, cuffed border resembling a royal bracelet. Finally, hidden elements like the bride’s name or the groom’s initial are integrated subtly. Together, these components transform a simple application into a royal royal front hand mehndi design that feels like wearable art. Remember, the density of the design should be high without looking cluttered, ensuring that every glance reveals a new detail in your royal royal front hand mehndi design.
Step-by-Step Process to Create a Royal Royal Front Hand Mehndi Design
Creating a flawless royal royal front hand mehndi design requires both skill and patience. Here’s a professional breakdown. Step 1: Prepare the skin by cleansing and applying a light eucalyptus oil. This helps the royal royal front hand mehndi design stain darker. Step 2: Start with a central focal point—usually a large, intricate paisley right in the middle of the palm. This anchors your royal royal front hand mehndi design. Step 3: Branch out from this paisley using curved vines that wrap around the thumb pad and the base of the fingers. Step 4: Fill the gaps with delicate dots, tiny flowers, and seed-like dashes. A true royal royal front hand mehndi design never leaves empty spaces unadorned. Step 5: Work on the fingers one by one. Each finger in a royal royal front hand mehndi design should have a continuous pattern from the knuckle to the tip, often ending in a pointed or rounded cap. Step 6: Add the “royal cuff” at the wrist. This is a thick border of overlapping arches or geometric diamonds. Step 7: Incorporate a hidden motif—perhaps a peacock or a lotus—to elevate the royal royal front hand mehndi design to royal status. Step 8: Let the paste dry for at least 4-6 hours. Scrape it off gently and apply a mixture of lemon and sugar to seal the royal royal front hand mehndi design. Step 9: Avoid water for 12 hours. The final stain of your royal royal front hand mehndi design should be a deep maroon or almost black, which is the ultimate sign of a high-quality royal application.
Top 5 Variations of Royal Royal Front Hand Mehndi Design for Brides
Brides today can choose from multiple avatars of the royal royal front hand mehndi design. Here are the top five. Variation 1: The Traditional Rajasthani royal royal front hand mehndi design – this features miniature portraits of elephants, royalty, and palace windows. The front hand becomes a canvas for historical storytelling. Variation 2: The Arabic Royal royal royal front hand mehndi design – uses flowing vines and large floral motifs with less density but more negative space. It’s airy yet regal, perfect for summer weddings. Variation 3: The Indo-Western Fusion royal royal front hand mehndi design – incorporates geometric patterns, chevrons, and even mandalas. This version appeals to brides who want a modern twist on a royal royal front hand mehndi design. Variation 4: The Minimalist Royal royal royal front hand mehndi design – focuses on just the fingers and the center of the palm with bold, thick lines and very few fillings. Despite being sparse, it retains a majestic look due to the strategic placement of royal symbols like crowns and scepters. Variation 5: The Full Coverage royal royal front hand mehndi design – leaves almost no skin visible, using ultra-fine lines and shading techniques. This is for the bride who wants maximum impact. Each variation of the royal royal front hand mehndi design can be further customized with glitter, stones, or even a touch of white mehndi for contrast. Whichever you pick, ensure your royal royal front hand mehndi design aligns with your outfit’s embroidery style.
Pro Tips for Long-Lasting and Darker Royal Royal Front Hand Mehndi Design
A beautiful pattern is only half the victory; the stain depth of your royal royal front hand mehndi design determines its final glory. Follow these pro tips. Tip 1: Always choose fresh, chemical-free mehndi cones. Organic henna produces a darker, richer stain for your royal royal front hand mehndi design. Tip 2: Avoid washing your hands for at least 8 hours after applying the royal royal front hand mehndi design. Tip 3: Apply heat – use a hair dryer on a low setting or keep your hands near a warm lamp while the royal royal front hand mehndi design dries. This intensifies the dye release. Tip 4: Use a mix of clove oil and lemon juice as a sealant. Clove oil contains eugenol, which darkens the royal royal front hand mehndi design significantly. Tip 5: Do not peel off the dried paste; instead, scrape it with a blunt knife. Peeling removes the upper layer of stained skin. Tip 6: Stay away from chlorine and harsh soaps for 24-48 hours post-application. Chlorine can ruin your royal royal front hand mehndi design stain. Tip 7: Apply Vicks VapoRub or any balm containing menthol over the dried royal royal front hand mehndi design before sleeping – the heat generated helps the stain set deeper. Tip 8: If you want a nearly black royal royal front hand mehndi design, apply a thin layer of sugar water multiple times while the paste is still on. Following these steps ensures your royal royal front hand mehndi design remains vibrant for up to three weeks.
Common Mistakes to Avoid When Choosing a Royal Royal Front Hand Mehndi Design
Even the most skilled artists can ruin a royal royal front hand mehndi design if basic rules are ignored. Avoid these pitfalls. Mistake 1: Overcrowding the front hand with too many disconnected elements. A royal royal front hand mehndi design should flow; choppy patterns break the royal illusion. Mistake 2: Neglecting the thumb area. The thumb in a royal royal front hand mehndi design is often visible during hand gestures, so leaving it blank destroys the symmetrical vibe. Mistake 3: Using inconsistent line thickness. Royal patterns require a balance of thick outlines and thin fillings. If your royal royal front hand mehndi design has wobbly, uneven lines, it looks amateur. Mistake 4: Ignoring the web between fingers. A true royal royal front hand mehndi design includes small motifs or dots in these webs to connect the overall design. Mistake 5: Copying a design without considering hand shape. A royal royal front hand mehndi design that looks good on a long, slender hand may appear cramped on a smaller hand. Always customize. Mistake 6: Applying the design too close to the nails – mehndi paste can stain nails yellow, and a royal royal front hand mehndi design should enhance, not discolor. Mistake 7: Forgetting the reverse side of the fingers. A complete royal royal front hand mehndi design also covers the outer edges of fingers, so when you close your hand, the pattern continues seamlessly. Avoid these errors, and your royal royal front hand mehndi design will achieve the perfection it deserves.
How to Accessorize and Style Your Royal Royal Front Hand Mehndi Design
Your royal royal front hand mehndi design does not exist in isolation—it interacts with jewelry, outfits, and even nail polish. To maximize the visual impact, follow this styling guide. First, pair your royal royal front hand mehndi design with kundan or polki bracelets. The uncut diamonds reflect light onto the mehndi, making the royal royal front hand mehndi design appear even more intricate. Second, choose rings that sit above the mehndi patterns rather than covering them. A single statement ring on the middle finger complements a royal royal front hand mehndi design beautifully. Third, your nail color matters. Nude, maroon, or gold nail polishes work best because they do not clash with the reddish-brown stain of your royal royal front hand mehndi design. Avoid neon or blue shades, as they distract from the royal theme. Fourth, consider the sleeve length of your outfit. For a full-sleeved ensemble, the royal royal front hand mehndi design should extend only to the mid-wrist. For sleeveless or short-sleeved lehengas, elongate the royal royal front hand mehndi design up to the forearm to create a seamless look. Fifth, use temporary tattoos or metallic stickers to accentuate certain parts of your royal royal front hand mehndi design (especially the cuff area) for evening events. Finally, coordinate with your dupatta. If your dupatta has heavy zari work, let your royal royal front hand mehndi design be slightly less dense to avoid visual overload. Remember, the goal is harmony. A well-styled royal royal front hand mehndi design not only enhances your hands but also elevates your entire bridal aura.
Conclusion
In the world of body art, few styles command as much admiration as the royal royal front hand mehndi design. From its deep-rooted cultural symbolism to its breathtaking visual complexity, this design offers every woman a chance to feel like queen—even if just for a day. Whether you opt for a traditional Rajasthani interpretation or a modern Arabic fusion, the royal royal front hand mehndi design remains unmatched in its ability to blend elegance with storytelling. By understanding the key elements, avoiding common mistakes, and following professional aftercare, you can ensure that your royal royal front hand mehndi design becomes the most photographed part of your celebration. Moreover, with endless variations available, no two royal royal front hand mehndi design patterns need ever look the same. So, the next time you sit for a mehndi application, demand nothing less than a royal royal front hand mehndi design. Let your front hand declare your majesty, and watch as every onlooker falls in love with the intricate dance of henna on your skin. Embrace the royalty, wear it with pride, and let your royal royal front hand mehndi design speak volumes without uttering a single word.
FAQs
1: How long does it take to apply a full royal royal front hand mehndi design?
A: A detailed royal royal front hand mehndi design typically takes 45 minutes to 1.5 hours, depending on the complexity and the artist’s speed. The drying and setting process requires an additional 4-6 hours for the perfect stain.
2: Can I get a royal royal front hand mehndi design if I have small hands?
A: Absolutely. A skilled artist will scale down the motifs and use finer lines to adapt the royal royal front hand mehndi design to your hand size. Avoid overly large paisleys and opt for micro-detailing instead.
3: Is the royal royal front hand mehndi design suitable for pregnant women?
A: Natural mehndi is safe, but always check for additives like PPD (paraphenylenediamine). A pure organic royal royal front hand mehndi design poses no risk. However, consult your doctor before any body art application during pregnancy.
4: How do I remove a royal royal front hand mehndi design faster if needed?
A: To speed up fading of a royal royal front hand mehndi design, exfoliate with a mixture of lemon juice and sugar scrub, use warm water and soap frequently, or apply a diluted hydrogen peroxide solution. Avoid bleaching as it can damage skin.
5: Can I wear mehndi gloves or stencils for a royal royal front hand mehndi design?
A: Stencils can provide a basic outline, but a true royal royal front hand mehndi design requires freehand detailing for authentic curves and fillings. Gloves are not recommended because they cannot create the necessary pressure variations for royal motifs.